Sockets made easy - Action Cable

Action Cable seamlessly integrates WebSockets with the rest of your Rails application. It allows for real-time features to be written in Ruby in the same style and form as the rest of your Rails application, while still being performant and scalable. It’s a full-stack offering that provides both a client-side JavaScript framework and a server-side Ruby framework. You have access to your full domain model written with Active Record or your ORM of choice.
A single Action Cable server can handle multiple connection instances. It has one connection instance per WebSocket connection. A single user may have multiple WebSockets open to your application if they use multiple browser tabs or devices. The client of a WebSocket connection is called the consumer.
Each consumer can in turn subscribe to multiple cable channels. Each channel encapsulates a logical unit of work, similar to what a controller does in a regular MVC setup. For example, you could have a ChatChannel and an AppearancesChannel, and a consumer could be subscribed to either or to both of these channels. At the very least, a consumer should be subscribed to one channel.
When the consumer is subscribed to a channel, they act as a subscriber. The connection between the subscriber and the channel is, surprise-surprise, called a subscription. A consumer can act as a subscriber to a given channel any number of times. For example, a consumer could subscribe to multiple chat rooms at the same time. (And remember that a physical user may have multiple consumers, one per tab/device open to your connection).
Each channel can then again be streaming zero or more broadcastings. A broadcasting is a pubsub link where anything transmitted by the broadcaster is sent directly to the channel subscribers who are streaming that named broadcasting.
As you can see, this is a fairly deep architectural stack. There’s a lot of new terminology to identify the new pieces, and on top of that, you’re dealing with both client and server side reflections of each unit.
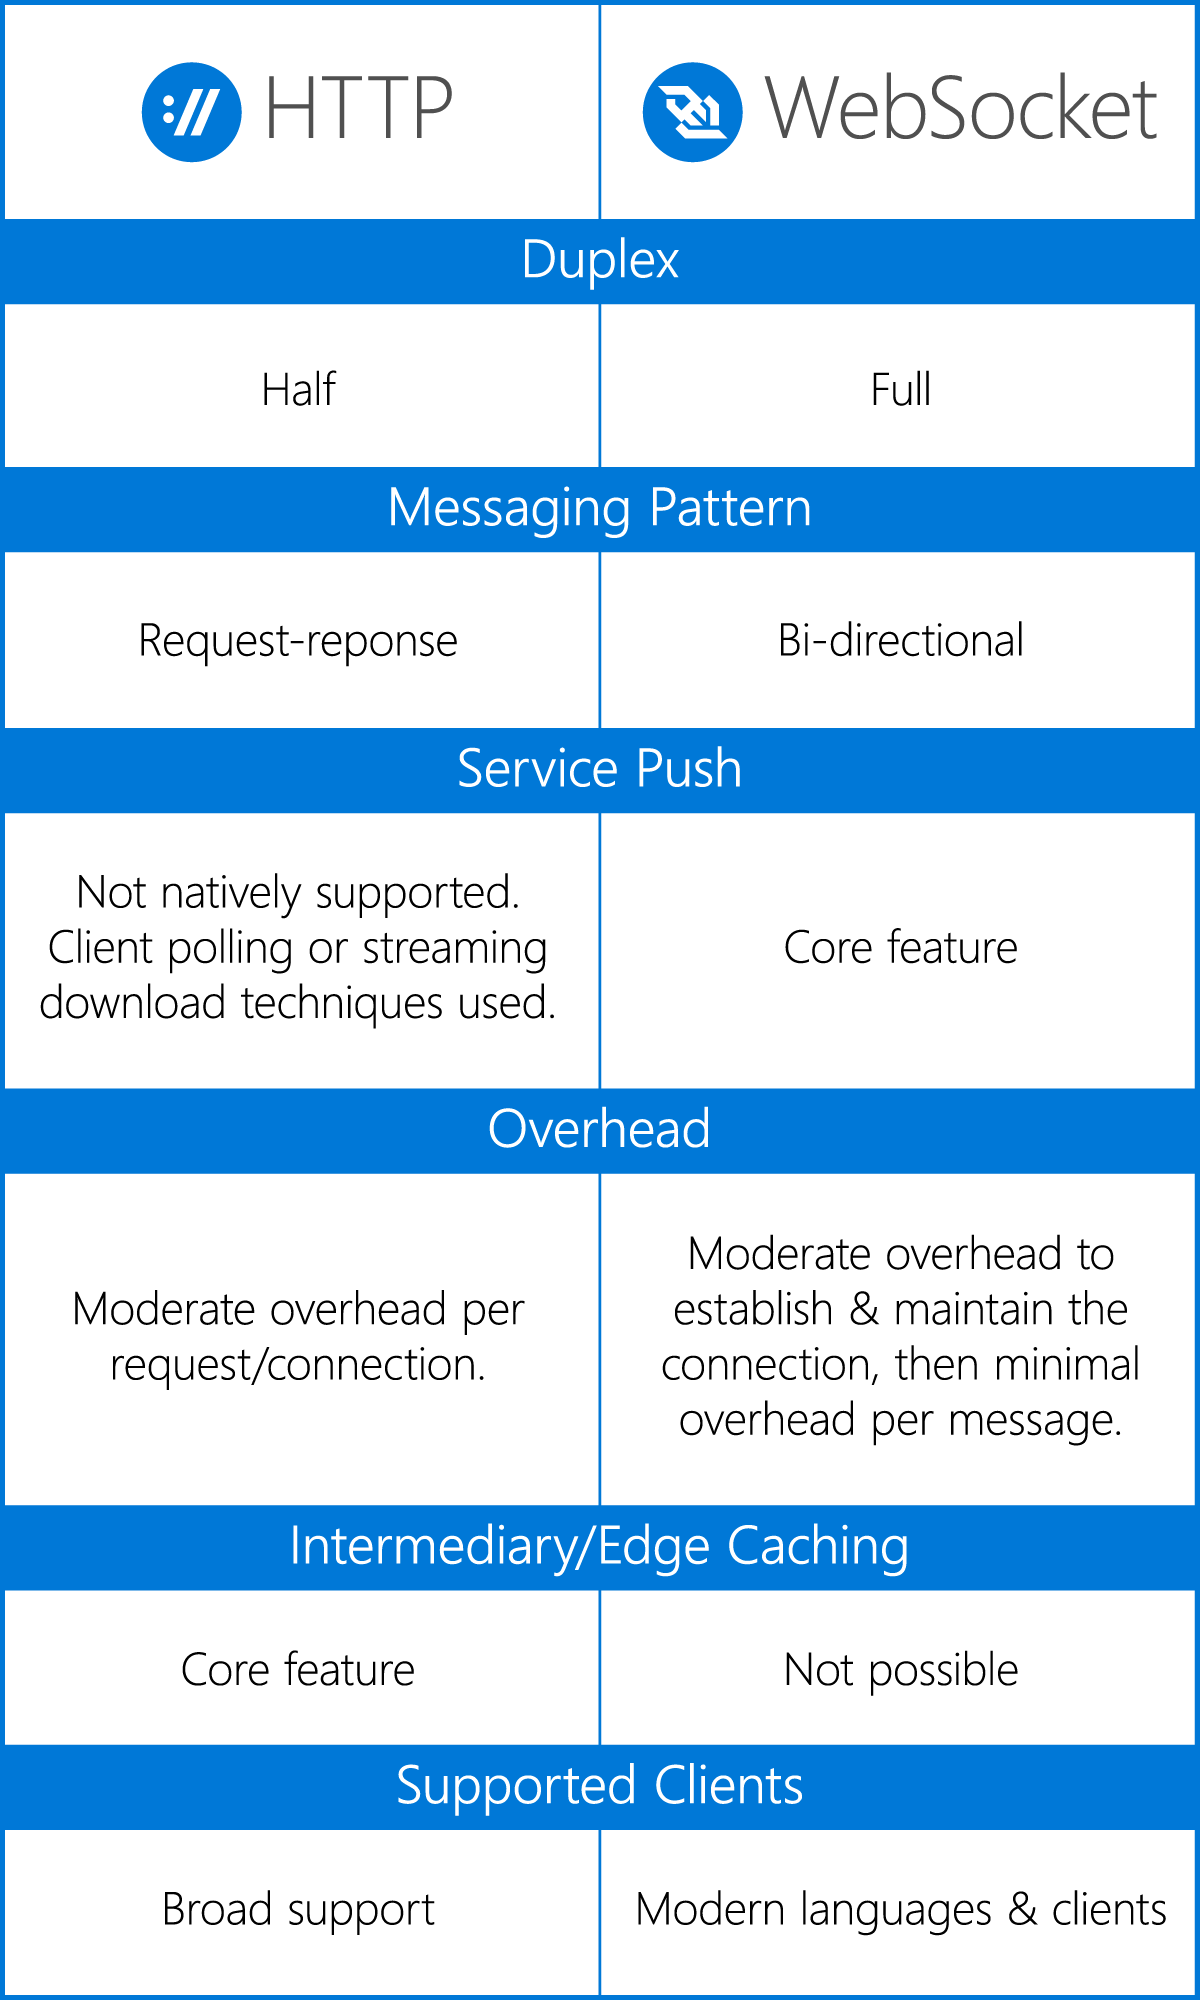
Why use websocket over http?
A webSocket is a continuous connection between client and server. That continuous connection allows the following:
-
Data can be sent from server to client at any time, without the client even requesting it. This is often called server-push and is very valuable for applications where the client needs to know fairly quickly when something happens on the server (like a new chat messages has been received or a new price has been udpated). A client cannot be pushed data over http. The client would have to regularly poll by making an http request every few seconds in order to get timely new data. Client polling is not efficient.
-
Data can be sent either way very efficiently. Because the connection is already established and a webSocket data frame is very efficiently organized, one can send data a lot more efficiently that via an HTTP request that necessarily contains headers, cookies, etc…

What is full duplex communication?
Full duplex means that data can be sent either way on the connection at any time.
What do you mean by lower latency interaction
Low latency means that there is very little delay between the time you request something and the time you get a response. As it applies to webSockets, it just means that data can be sent quicker (particularly over slow links) because the connection has already been established so no extra packet roundtrips are required to establish the TCP connection.
So for the purposes of this tutorial we are going to investigate how to structure a basic application with some dynamic channels.
Generate your application
bundle exec rails new actioncable-test
Add jquery to your yarn file
yarn add jquery
Ensure that jquery is running in your application.js file
app/javascript/packs/application.js
// This file is automatically compiled by Webpack, along with any other files
// present in this directory. You're encouraged to place your actual application logic in
// a relevant structure within app/javascript and only use these pack files to reference
// that code so it'll be compiled.

require("@rails/ujs").start()
require("turbolinks").start()
require("@rails/activestorage").start()
require("channels")
require("jquery")

// Uncomment to copy all static images under ../images to the output folder and reference
// them with the image_pack_tag helper in views (e.g <%= image_pack_tag 'rails.png' %>)
// or the `imagePath` JavaScript helper below.
//
// const images = require.context('../images', true)
// const imagePath = (name) => images(name, true)
Add support to webpacker: config/webpack/environment.js
const { environment } = require('@rails/webpacker')

module.exports = environment
const webpack = require('webpack')
environment.plugins.prepend('Provide',
  new webpack.ProvidePlugin({
    $: 'jquery/dist/jquery.min',
    jQuery: 'jquery/dist/jquery.min'
  })
)
module.exports = environment
Next up; let’s generate a channel called room
bundle exec rails g channel room
Update the room_channel.rb to ensure that we can pass a dynamic variable called room_id param so we can have multiple channels based on dynamic content.
# app/channels/room_channel.rb
class RoomChannel < ApplicationCable::Channel
  def subscribed
    stream_from "channel_#{ params[:room_id] }"
  end

  def unsubscribed
    # Any cleanup needed when channel is unsubscribed
  end
end
Next up let’s create the frontend system; create a table called messages with the following fields:
class CreateMessages < ActiveRecord::Migration[6.0]
  def change
    create_table :messages do |t|
      t.text :content
      t.string :room_name
      t.string :username
      t.timestamps
    end
  end
end
Create the controller /app/controller/messages_controller.rb
class MessagesController < ApplicationController
  def new
    @message = Message.new
  end

  def create
    @message = Message.create(msg_params)
    if @message.save
      ActionCable.server.broadcast "channel_#{ @message.room_name }",
                                   content: "#{ @message.username } says: #{ @message.content } to room #{ @message.room_name}"
      head :ok
    end
  end

  def room
    @message = Message.new
  end
  private

  def msg_params
    params.require(:message).permit(:content, :username, :room_name)
  end
end
Stepping through the messages#new action we are broadcasting content to the channel_* room name with a set of content that is submitted by the form. This parameter allows the channel to be dynamic.
ActionCable.server.broadcast "channel_#{ @message.room_name }",
                             content: "#{ @message.username } says: #{ @message.content } to room #{ @message.room_name}"
Update the routing config/routes.rb
Rails.application.routes.draw do
  # For details on the DSL available within this file, see https://guides.rubyonrails.org/routing.html

  # Serve websocket cable requests in-process
  mount ActionCable.server => '/cable'

  resources :messages
  get "/room/:room_name" => "messages#room", as: :room

  root to: "pages#home"
end
This allows us to visit routes like /room/australia and /room/usa
We can now focus on the frontend form: app/views/messages/room.html.haml
%h2= "Room #{  params[:room_name] }"

%div{ id: "room_messages", "data-channel-room": "#{ params[:room_name] }" }

= form_for @message, remote: true do |f|
  %div
    %label message
    = f.text_field :content
  %div
    %label username
    = f.text_field :username
  %div
    %label room
    = f.text_field :room_name, value: params[:room_name]
  = f.submit


%h2 New
#msg
  Messages below here:
  %br

%h2 Existing
%ol
  - Message.where(room_name: params[:room_name]).order("id desc").each do |message|
    %li
      = "#{ message.created_at } - @#{ message.username }: #{ message.content } to room: #{ @message.room_name }"
We are fetching existing messages from the database and displaying them on the page; these do not have to arrive via websockets.
The important line is here
%div{ id: "room_messages", "data-channel-room": "#{ params[:room_name] }" }

=>

%div{ id: "room_messages", "data-channel-room": "usa" }
%div{ id: "room_messages", "data-channel-room": "australia" }
We can now fetch the data attribute ‘data-channel-room’ when the page loads and use that in the creation / subscription of the channel we need to subscribe to and from: app/javascript/channels/room_channel.js
import consumer from "./consumer"

$(document).on('turbolinks:load', function () {
  consumer.subscriptions.create({
    channel: "RoomChannel",
    room_id: $('#room_messages').attr('data-channel-room') }, {

      connected() {
	console.log("connected to the room");
	// Called when the subscription is ready for use on the server
      },

      disconnected() {
	console.log("disconnected from the room");
	// Called when the subscription has been terminated by the server
      },

      received(data) {
	console.log("Receiving data");
	console.log(data.content)
	$('#msg').append('<div class="message"> ' + data.content + '</div>');
	// Called when there's incoming data on the websocket for this channel
      }
    });


  let submit_messages;

  $(document).on('turbolinks:load', function () {
    submit_messages()
  })

  submit_messages = function () {
    $('#message_content').on('keydown', function (event) {
      if (event.keyCode == 13) {
	$('input').click()
	event.target.value = ''
	event.preventDefault()
      }
    })
  }
})
The important section is that we fetch the attribute from the /app/views/messages/show.html div and use that inside the creation of the channel via ‘room_id’ as we can see above and below.
consumer.subscriptions.create({
    channel: "RoomChannel",
    room_id: $('#room_messages').attr('data-channel-room') }, { ...
The entire repository is available here: https://bitbucket.org/vayutechnology/actioncable-test
Some further reading for you on websockets:

